Installing an MP3/Auxillary Connection to the Stock Stereo System of an Early Model N
#1
 04-06-2010, 10:18 PM


The early model NF Sonata (2006 thru 2008) was equipped with fairly decent audio systems, but completely lacked any means of feeding music from an MP3 player for playback through the head unit. Aftermarket FM transmitters have been the major alternative, but the tonal quality is usually quite poor, finding an open frequency can be frustrating and these units are intermittently jammed by transmitters in neighboring vehicles. FM modulators solve the frequency and jamming problems, but tonal quality is still poor compared to the CD or XM sources. I personally think the analog feed into the FM tuner is the weak link in these units.
I decided my goal was to find a solution that bypasses the FM tuner altogether. I had read about XM receiver-based modulators on various forums. The analog output stream of the MP3 player passes through an analog-to-digital converter before it is fed to the XM receiver, supposedly with better sound quality. AAMP of America has developed and sells such a product through their PAC division that solves this problem in 2007 and 2008 Sonata models equipped with Infinity head units and integrated XM satellite receivers. The product consists of a device that plugs into the stereo’s wiring harness and provides a hard wired auxiliary connection to the unit that is controlled as one of the XM channels. XM receivers were not integrated with the stock stereos used in the 2006 Sonata. Sorry, but this solution will not work with stock 2006 model year vehicles.
Materials:
The car is a 2008 Limited equipped with an OEM Infinity V490 multi-disk CD/MP3/XM system manufactured by the Visteon Corp. Even though a person can load 6 MP3 CDs (which can hold 50-60 albums combined, representing hundreds of song titles) into this stereo, the person that drives this car (the wife) thinks this is an insufficient amount of music to choose from.

The system comes as two components. A box contains the PXAUX unit (part number PXAUX) with installation instructions and the auxiliary cabling needed to connect external sources (MP3 player, iPod, DVD player, etc). The unit supports the installation of two separate auxiliary input lines. The cabling supports either RCA or 3.5 mm stereo style input connectors. A plastic bag contains a custom harness that splices the unit into the car’s audio system. Part number PGHHY3 is the correct harness for the 2007/2008 Sonata. Yes, the company does make harnesses to install the PXAUX unit in other makes and models. The entire PAC product guide, along with a vehicle lookup menu, can be found at http://www.pac-audio.com/products.aspx. MSRP for both components is currently ~$130. Several internet vendors offer the product for much less. I found both items on sale at Amazon.com for $89, including shipping.
PXAUX Installation:
First, disconnect the ground cable to the battery and remove the OEM head unit from the dash. You may wish to first write down all the presets on the radio, but the V490 unit has some sort of static memory. Preset information is maintained while the unit is out of the car for extended periods (at least several hours). Instructions for removing the head unit are provided on the Hyundai service site at www.hmaservice.com. Required tools include a #2 Phillips screw driver, a couple of small flat blade drivers covered in tape to pry dash pieces loose and a 5/16” or 8 mm nut driver. Once all the dash pieces, screws and bolts have been removed, sit in the passenger seat and pull the unit straight out from the dash until it just clears the console. Hold the unit face down in your left hand and then disconnect the antennae lead and two harness connections with your right hand. FYI, the Hyundai part number for the little plastic “damn-it” clips you will loose inside the dash is #84747-1C000, and they cost ~25 to 30 cents a piece.
Deciding where to install the female stereo jack came next. I decided I did not wish to further dismantle the crash pad and center console, so the female jack was going to be mounted on the head unit face plate. Once I had the unit removed, the placement decision became fairly easy. The bottom edge of the face plate is molded as a flange with a series of gussets that form a line of square pockets along the back side. The pockets formed on the extreme ends were nearly perfect to insert and support the square body of the stereo jack. I chose the end pocket direct under the tuner **** as the best spot. Dressing the body of the jack with a few strokes of 400 grit sandpaper gave a perfect fit. One of the solder prongs on the jack was mounted on the side. With a flat edged file I made a relief cut in the bottom lip of the face plate to accommodate the prong, being careful to keep the slot on the unexposed lip of the flange.


Drilling a precise hole for the jack ferrule took some thought. Since the Radio Shack package contained 2 jacks, I sacrificed one jack to serve as a drill bit guide. I simply removed the guts of the extra jack with a pair of needle-nose pliers and pushed it into the square pocket. I then used a 1/8” bit from the back side, using the ferrule to locate where the bit would pass through the plastic face plate. I then removed the cannibalized jack body and drilled from the front with 15/64” bit using the 1/8” hole as a pilot hole. To secure the jack in place, I cross drilled a hole for a �” #4 pan head sheet metal screw through the gusset that formed the side wall of the installation pocket.


I cut the male jack end off one of the cables to the PXAUX and then soldered the wires to the female jack. The installed pigtail looks like:
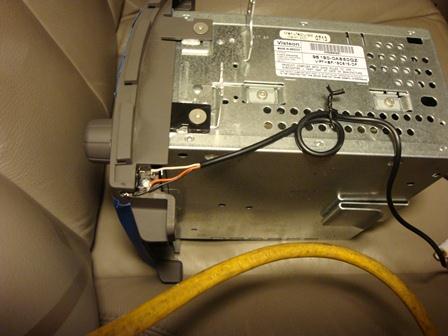

Installation of the PXAUX is relative simple. The harness insert attaches directly to the two existing audio harness connectors, leaving them unmodified. The insert has a third connector that securely plugs into the back side of the PXAUX unit.
The auxiliary cables plug directly into the round “s-video” style sockets on the front of the PXAUX. The USB jack on the PXAUX does not support audio input, but it there for connecting to a PC to update firmware of the device. To insure the auxiliary cables did not pull loose while reinstalling the head unit, I wrapped black electrical tape around the connectors and then the body of the unit.
Speaking of stuffing the head unit back in the hole, this process turned out to be the biggest challenge. The harness insert adds a good 12” of extra cabling, and I had to figure out where to stuff the PXAUX box. Above and behind the vertical silver metal support at the back of the dash, there is an open area that forms a pocket between the left and right side windshield ventilation ducts. I tucked the PXAUX unit (with all cables connected) back up in this pocket and then routed the main cables to the sides as I inserted the head unit. Remember to reconnect the antennae lead before shoving the head unit back in its spot.
Back together, the modified head unit looks like this:
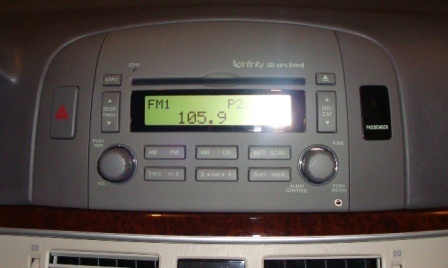
The jack looks like it is in a spot designed for it. It’s difficult to tell, but the jack ferrule is flush with the head unit face plate.
To use the auxiliary channel, connect any MP3 player with a double ended male stereo cable and press the [XM] selector button. It takes a few seconds the first time as the PXAUX installs itself in the last two available channels on your XM receiver. In my case, AUX1 was channel 248, AUX2 is channel 249 if I had an installed cable to use it. I don’t subscribe to XM, but I understand the receiver will continue to work with the satellite broadcasts with the PXAUX installed. You can preset one or more of the bottom buttons to either of these channels.
How does the unit sound? Right after installing the unit, we took a trip that involved 8 hours of driving each way. Not quite as crisp as a true audio CD, but we could tell no difference between the PXAUX feed from an MP3 player using WMA files and a CD playing either MP3 or WMA files. My wife has a Creative ZEN player that we think tended to sound better than my older iRiver H30 player, but both worked very well with the system. The sound level gain on the player was turned all the way up, and no noticeable distortion occurred. Yes, I am more than satisfied with the end result.
Ken99
I decided my goal was to find a solution that bypasses the FM tuner altogether. I had read about XM receiver-based modulators on various forums. The analog output stream of the MP3 player passes through an analog-to-digital converter before it is fed to the XM receiver, supposedly with better sound quality. AAMP of America has developed and sells such a product through their PAC division that solves this problem in 2007 and 2008 Sonata models equipped with Infinity head units and integrated XM satellite receivers. The product consists of a device that plugs into the stereo’s wiring harness and provides a hard wired auxiliary connection to the unit that is controlled as one of the XM channels. XM receivers were not integrated with the stock stereos used in the 2006 Sonata. Sorry, but this solution will not work with stock 2006 model year vehicles.
Materials:
The car is a 2008 Limited equipped with an OEM Infinity V490 multi-disk CD/MP3/XM system manufactured by the Visteon Corp. Even though a person can load 6 MP3 CDs (which can hold 50-60 albums combined, representing hundreds of song titles) into this stereo, the person that drives this car (the wife) thinks this is an insufficient amount of music to choose from.
- The PAC iSimple PXAUX System.
The system comes as two components. A box contains the PXAUX unit (part number PXAUX) with installation instructions and the auxiliary cabling needed to connect external sources (MP3 player, iPod, DVD player, etc). The unit supports the installation of two separate auxiliary input lines. The cabling supports either RCA or 3.5 mm stereo style input connectors. A plastic bag contains a custom harness that splices the unit into the car’s audio system. Part number PGHHY3 is the correct harness for the 2007/2008 Sonata. Yes, the company does make harnesses to install the PXAUX unit in other makes and models. The entire PAC product guide, along with a vehicle lookup menu, can be found at http://www.pac-audio.com/products.aspx. MSRP for both components is currently ~$130. Several internet vendors offer the product for much less. I found both items on sale at Amazon.com for $89, including shipping.
- 3.5 mm female stereo jacks, Radio Shack #274-0279. Installing one of these female jacks is optional.
PXAUX Installation:
First, disconnect the ground cable to the battery and remove the OEM head unit from the dash. You may wish to first write down all the presets on the radio, but the V490 unit has some sort of static memory. Preset information is maintained while the unit is out of the car for extended periods (at least several hours). Instructions for removing the head unit are provided on the Hyundai service site at www.hmaservice.com. Required tools include a #2 Phillips screw driver, a couple of small flat blade drivers covered in tape to pry dash pieces loose and a 5/16” or 8 mm nut driver. Once all the dash pieces, screws and bolts have been removed, sit in the passenger seat and pull the unit straight out from the dash until it just clears the console. Hold the unit face down in your left hand and then disconnect the antennae lead and two harness connections with your right hand. FYI, the Hyundai part number for the little plastic “damn-it” clips you will loose inside the dash is #84747-1C000, and they cost ~25 to 30 cents a piece.
Deciding where to install the female stereo jack came next. I decided I did not wish to further dismantle the crash pad and center console, so the female jack was going to be mounted on the head unit face plate. Once I had the unit removed, the placement decision became fairly easy. The bottom edge of the face plate is molded as a flange with a series of gussets that form a line of square pockets along the back side. The pockets formed on the extreme ends were nearly perfect to insert and support the square body of the stereo jack. I chose the end pocket direct under the tuner **** as the best spot. Dressing the body of the jack with a few strokes of 400 grit sandpaper gave a perfect fit. One of the solder prongs on the jack was mounted on the side. With a flat edged file I made a relief cut in the bottom lip of the face plate to accommodate the prong, being careful to keep the slot on the unexposed lip of the flange.
Drilling a precise hole for the jack ferrule took some thought. Since the Radio Shack package contained 2 jacks, I sacrificed one jack to serve as a drill bit guide. I simply removed the guts of the extra jack with a pair of needle-nose pliers and pushed it into the square pocket. I then used a 1/8” bit from the back side, using the ferrule to locate where the bit would pass through the plastic face plate. I then removed the cannibalized jack body and drilled from the front with 15/64” bit using the 1/8” hole as a pilot hole. To secure the jack in place, I cross drilled a hole for a �” #4 pan head sheet metal screw through the gusset that formed the side wall of the installation pocket.
I cut the male jack end off one of the cables to the PXAUX and then soldered the wires to the female jack. The installed pigtail looks like:
Installation of the PXAUX is relative simple. The harness insert attaches directly to the two existing audio harness connectors, leaving them unmodified. The insert has a third connector that securely plugs into the back side of the PXAUX unit.
The auxiliary cables plug directly into the round “s-video” style sockets on the front of the PXAUX. The USB jack on the PXAUX does not support audio input, but it there for connecting to a PC to update firmware of the device. To insure the auxiliary cables did not pull loose while reinstalling the head unit, I wrapped black electrical tape around the connectors and then the body of the unit.
Speaking of stuffing the head unit back in the hole, this process turned out to be the biggest challenge. The harness insert adds a good 12” of extra cabling, and I had to figure out where to stuff the PXAUX box. Above and behind the vertical silver metal support at the back of the dash, there is an open area that forms a pocket between the left and right side windshield ventilation ducts. I tucked the PXAUX unit (with all cables connected) back up in this pocket and then routed the main cables to the sides as I inserted the head unit. Remember to reconnect the antennae lead before shoving the head unit back in its spot.
Back together, the modified head unit looks like this:
The jack looks like it is in a spot designed for it. It’s difficult to tell, but the jack ferrule is flush with the head unit face plate.
To use the auxiliary channel, connect any MP3 player with a double ended male stereo cable and press the [XM] selector button. It takes a few seconds the first time as the PXAUX installs itself in the last two available channels on your XM receiver. In my case, AUX1 was channel 248, AUX2 is channel 249 if I had an installed cable to use it. I don’t subscribe to XM, but I understand the receiver will continue to work with the satellite broadcasts with the PXAUX installed. You can preset one or more of the bottom buttons to either of these channels.
How does the unit sound? Right after installing the unit, we took a trip that involved 8 hours of driving each way. Not quite as crisp as a true audio CD, but we could tell no difference between the PXAUX feed from an MP3 player using WMA files and a CD playing either MP3 or WMA files. My wife has a Creative ZEN player that we think tended to sound better than my older iRiver H30 player, but both worked very well with the system. The sound level gain on the player was turned all the way up, and no noticeable distortion occurred. Yes, I am more than satisfied with the end result.
Ken99
Last edited by ken99; 10-06-2011 at 10:27 PM.
#2
05-22-2011, 08:34 PM

Hi,
I have a 08 Hyundai Sonata and I want to do this. But my car is a different than yours in that it does not have a CD changer (nor a navigation system). But besides the CD changer, it looks the same as your last picture.
Will this still work for me? I just want to make sure before purchasing the PXAUX. Thanks.
#3
09-29-2011, 12:26 PM

Hi Ken99, Thank you for your VERY informative post. I tried to get the PGHHY3 but it is no longer available anywhere. Not even from PAC. There is a similar connector for FORD PGHFD1 that could be modified for Hyundai.
My question is, if you still have instructions for PGHHY3, did they call for a change on the DIP switches of the PXAUX module? I yes, what are the changes to the switches?
Thank you
My question is, if you still have instructions for PGHHY3, did they call for a change on the DIP switches of the PXAUX module? I yes, what are the changes to the switches?
Thank you
#4
10-05-2011, 11:57 PM
Sorry guys. I haven't been watching this thread for responses. I don't know why the jpg images are corrupt. I've removed the old image links until I can find and reload the image files.
The PXAUX unit requires that the head unit have the XM satellite receiver. The CD changer isn't invovled.
I'll have to see if I still have the installation instructions. I don't recall making any switch changes during installation. Yes, it looks like Hyundai models are no longer supported by PAC/AAMP.
Hi,
I have a 08 Hyundai Sonata and I want to do this. But my car is a different than yours in that it does not have a CD changer (nor a navigation system). But besides the CD changer, it looks the same as your last picture.
Will this still work for me? I just want to make sure before purchasing the PXAUX. Thanks.
I have a 08 Hyundai Sonata and I want to do this. But my car is a different than yours in that it does not have a CD changer (nor a navigation system). But besides the CD changer, it looks the same as your last picture.
Will this still work for me? I just want to make sure before purchasing the PXAUX. Thanks.
Hi Ken99, Thank you for your VERY informative post. I tried to get the PGHHY3 but it is no longer available anywhere. Not even from PAC. There is a similar connector for FORD PGHFD1 that could be modified for Hyundai.
My question is, if you still have instructions for PGHHY3, did they call for a change on the DIP switches of the PXAUX module? I yes, what are the changes to the switches?
Thank you
My question is, if you still have instructions for PGHHY3, did they call for a change on the DIP switches of the PXAUX module? I yes, what are the changes to the switches?
Thank you
Last edited by ken99; 10-06-2011 at 12:51 AM.


Thread
Thread Starter
Forum
Replies
Last Post
bicheck
Hyundai Azera
0
05-26-2015 03:17 PM
soulstorm1
New Member Area
0
05-24-2011 10:47 AM
jamsandwich
Hyundai Elantra Touring / i30
7
10-28-2009 11:08 AM

